本文共 1468 字,大约阅读时间需要 4 分钟。

Usually making Ubuntu mount a partition at startup would require fiddling with the “fstab” which is confusing. The easiest way to mount your partitions automatically when you turn on your computer is by reading this article. So let’s get started!
通常在启动时使Ubuntu挂载一个分区将需要弄乱“ fstab”,这会造成混淆。 打开计算机时自动挂载分区的最简单方法是阅读本文。 因此,让我们开始吧!
Image by
图片由
We are going to install the program that will make the process easy is called “Storage Device Manager”. Enter this command in a terminal window to install it:
我们将安装使该过程变得容易的程序,称为“存储设备管理器”。 在终端窗口中输入以下命令进行安装:
sudo apt-get install pysdm
须藤apt-get install pysdm

Or search for it in Ubuntu Software Center
或在Ubuntu软件中心中搜索它
Now fire it up from System > Administration > Storage Device Manager. Once running, from the left hand side panel choose the partition you want to be mounted on startup (expand the hard drives list first). Then click on “Assistant” on the right side.
现在从系统>管理>存储设备管理器中启动它。 运行后,从左侧面板中选择要在启动时挂载的分区(首先扩展硬盘驱动器列表)。 然后单击右侧的“助手”。

Now you are presented with the options window. Just check the “The file system is mounted at boot time” and uncheck the “Mount file system in read-only mode”.
现在,您将看到选项窗口。 只需选中“文件系统在引导时已挂载”,然后取消选中“以只读模式安装文件系统”。
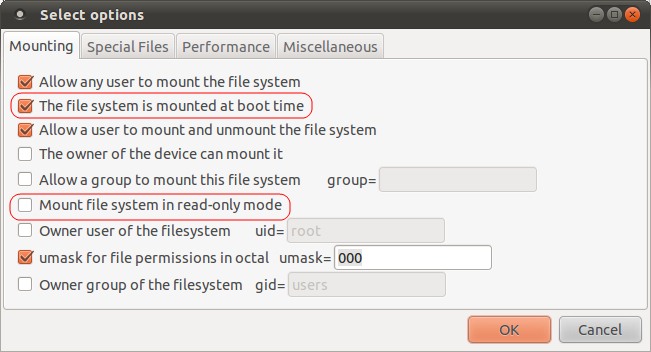
You can edit the other options if you want but be careful, it might damage your system. When done click the “OK” button then hit “Apply”. Close the program and restart to see the effect. That’s it!
您可以根据需要编辑其他选项,但要小心,这可能会损坏系统。 完成后,单击“确定”按钮,然后单击“应用”。 关闭程序,然后重新启动以查看效果。 而已!
翻译自:
转载地址:http://lnzwd.baihongyu.com/